Thank you PEEPS
for providing me with products to review, free of charge.
These are my own honest opinions.
My daughter loves to be in the kitchen with me. I try and include her in the cooking and baking as much as possible but it isn’t always easy to find tasks for her because she is only 2. This year, I wanted to create fun Easter-themed recipes for her and I to do. It had to be easy and kid-friendly, it had to be quick, and of course it had to be colorful and yummy.
PEEPS has tons of marshmallow and chocolate treats, many of which are designed specifically around a theme (Christmas, Easter, Halloween,etc). Drawing my inspiration from the recipe section on their website, here is what I came up with:
Marshmallow Bunnies Dipped in Chocolate
Marshmallow Chicks in a Mini Wheat Nest
The Marshmallow Bunnies dipped in chocolate were super fun (and quick)! My daughter loved them and we’ll definitely do this recipe again. I think we’ll make more and offer them to her friends at daycare. I almost feel like I don’t need to explain the process but I will just because I discovered a few tricks to make faster and easier which I think you’ll like.
Ingredients:
PEEPS Marshmallow Bunnies – They come in many different colors and I strongly recommend the Chocolate Mouse Flavored Bunnies. Yum!
Chocolate chips – You can choose either milk chocolate or dark chocolate but my daughter isn’t a huge fan of dark chocoalte at the moment so milk chocolate it is!
Candy decorations such as sprinkles – Anything goes, use whatever you have on hand.
Small glass or shooter – Not mandatory but you’ll see in a minute why it’s a good idea to have one.
Baking sheet covered with parchment paper
Directions:
Fill your small glass with chocolate chips. I suggest you choose a small glass just wide enough to fit a bunny. My small glass contained enough melted chocolate to cover 4 bunnies and I like that it was less wasteful and easier to clean then a larger bowl.
Melt them in your microwave, in 30 second increments. Stir often to make sure they down burn. For the size of glass that I had, the chocolate was completely melted in 1 minute.
Using a spoon or a pastry bag or a ziploc bag (on which you cut one corner to use as a pastry bag), create small circles on chocolate on your parchment paper lined baking sheet. Make as many circles as you have bunnies. Don’t worry about making perfect circles but do try to make them as flat as possible. They will become the base on which to rest your bunnies so they can stand up.
Place your chocolate bases in the freezer or the fridge so they harden up. After a few minutes, check if they are ready and take them out.
While you wait, fill your glass with chocolate chips again and melt it.
Hold the glass and let your child dip a bunny in it. My daughter is only 2 and she was able to do it. The only thing to be careful about is the temperature of the chocolate. I always made sure it wasn’t too hot just in case she dipped her fingers in it – which she did… it’s chocolate, how could she resist?
Scrape off the excess from the bottom of the bunny. This is important if you don’t want to end up with a large puddle of chocolate around the base of the bunny.
Add sprinkles on the chocolate making sure to cover all sides. As a warning, if you’re doing this with a child, note that they have ABSOLUTELY no concept of ‘less is more’. For my daughter, ‘more is more’ and if I’d let her have her way, the chocoalte would probably have been entirely covered in sprinkles. As a side note, this turned out to be a great activity to practice her pincer grasp (taking something with the index and thumb). At first, she wanted to take handfuls of sprinkles but I taught her to use only her index and thumb instead.
Place your decorated bunny on a chocolate base. I was usually able to balance it on a base. Just keep an eye on them because some of them slowly move and might fall down before the chocolate hardens.
Repeat steps 5-9. I suggest you eat them quickly or store them in an airtight container in the fridge or freezer for maximum freshness.
I saw this cute PEEPS Crispy treats chicks and nests recipe on the PEEPS website and I knew I wanted to give them a try. I made a few modifications including using Mini Wheat instead of rice crispy cereal because I tought it would look more like little twigs so here’s how I made my Marshmallow Chicks in a Mini Wheat Nest.
Ingredients:
12 PEEPS Chicks – They come in different colors. You can also get sugar-free chicks or chocolate dipped chicks!
20-30 Jelly Beans to decorate the nests
3 cups of crushed Mini Wheat cereal – You can use a mortar or place them in a ziploc bag and crush them with a rolling pin.
1.5 to 2 cups of mini marshmallow
1.5 to 2 TBSP of margarine or butter
1/2 cup of coconut oil
2 egg yolks
1/8 to 1/4 cup of honey
Peppermint extract (to taste)
Food coloring – For more vivid colors, use gel food coloring. I get mine from the bakery in my grocery store and it’s super cheap.
Baking sheet covered with parchment paper or wax paper
Directions:
Begin by making the frosting by mixing the egg yolks and coconut oil in a bowl. Blend until smooth and fluffly.
Add honey. I recommend a taste test here because the honey flavor can be a bit much. Start by add 1/8 of a cup, taste it and add more if needed until you get a sweet taste that you like.
Add the peppermint extract and food coloring. I decided to go with green but you can experiment with whatever color you like.
Place in a pastry bag or a ziploc and refrigerate for about 1 hour. Note that the coconut oil with harden so you’ll need to take it out of the fridge and let it warm up a bit before attempting to spread it on your nests. If it’s still too hard, hold the bag in your hands and the coconut oil will start to melt.
For the Mini Wheat nests, melt the margarine or butter in a saucepan over low heat. Add 1.5 cups mashmallow and stir until melted. It is VERY important to use low heat. Don’t try to save time by melting them over high heat! They’ll melt alright but your treats will be rock hard. Trust me, I tested it for you…
Add the crushed Mini Wheat and stir until they are coasted in marshmallow. You may find you need to add a little more marshmallow to get the perfect texture.
Remove from heat and let it cool a bit. Once the mixture has cooled enough so you and your child can manipulate it with your hands, scoops some of it on the parchment lined baking sheet. I was in charge of making it a somewhat round shape and my daughter flattened to give them a nest shape. If you child is older, they could make the nests by themselves.
When the nests have cooled down and set, cover them with frosting. Ask your child to add a marshmallow chick and a couple Jelly Beans.
This recipe was longer than the chocolate dipped bunnies but not so long that my daughter lost interest. She was a great helper and there were many steps that she could participate in.
Having discovered PEEPS products, I will definitely look for them again for other themed recipes. They have fun products for Christmas, Halloween, and Valentine’s Day that are easy to use in simple recipes or crafts with kids. I saved a few items for her Easter basket but I have to admit I won’t be sharing my Peepsters with her. These decadent dark chocolate bites with marshmallow flavored creme are just for me!
Connect: Don’t forget to like PEEPS on Facebook, follow them on Pinterest and subscribe to their YouTube channel for all the latest news and promotions.
Yes, the whole idea was to have my 2 year old help out. She loves to be in the kitchen but there are many recipes that would have been too difficult or too long for her. These ones are quick and easy!
I just read about Peeps for Valentine’s Day so it’s only fitting to check out these cute Easter Peeps. They are so easy for kid’s to handle and not messy like chocolate! I love the pretty pastel colors of the new Peeps.
 Marshmallow Chicks in a Mini Wheat Nest
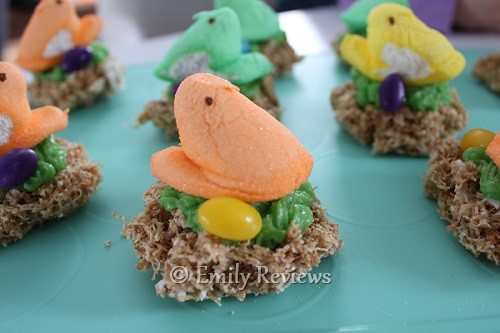 The Marshmallow Bunnies dipped in chocolate were super fun (and quick)! My daughter loved them and we’ll definitely do this recipe again. I think we’ll make more and offer them to her friends at daycare. I almost feel like I don’t need to explain the process but I will just because I discovered a few tricks to make faster and easier which I think you’ll like.
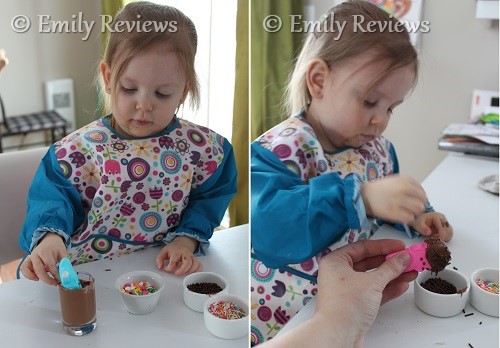 Ingredients:
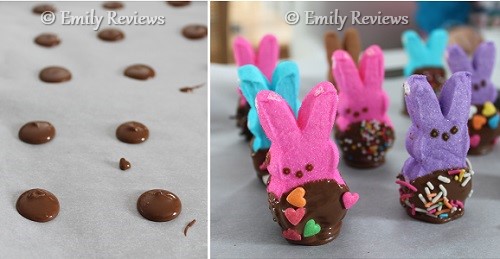 Directions:
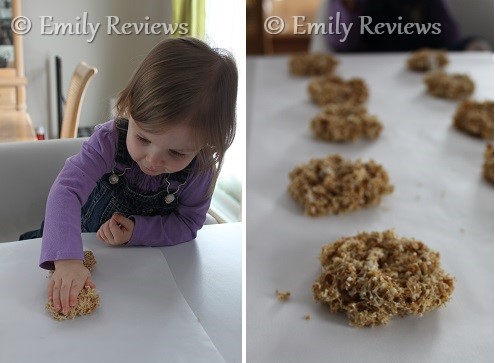 Ingredients:
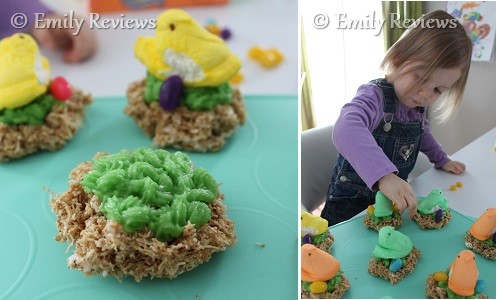 Directions:


")


Rachel
Deb E
kathy downey

I love the look of the nests for the peeps, so yummy! And adorable, I would love to make this with my daughter.